These notes generally apply to 1979 through 1993 240s except Bertone Coupe, taken from my family fleet
experiences with the following:
79 244DL, 83 244DL, 83 242Ti, 83 244Ti, 84 244DL, 89 245GL,
89 244GL, 90 244, 91 244DL, 91 244GL, 93 244 Updated 12/2024
Some factory manual and parts list research seems to reveal three major
model year groups, corresponding to the body design changes made to the 200 series
over its 19-year production run:
1975-1980, 1981-1985, 1986-1993
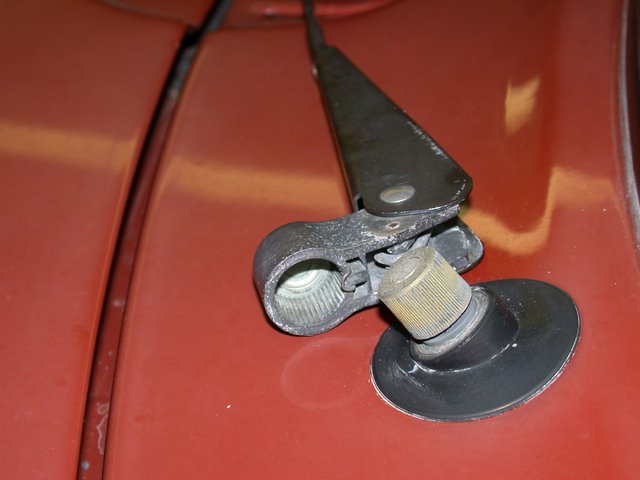
The early wiper arms attached without a nut, using a spring to retain them.
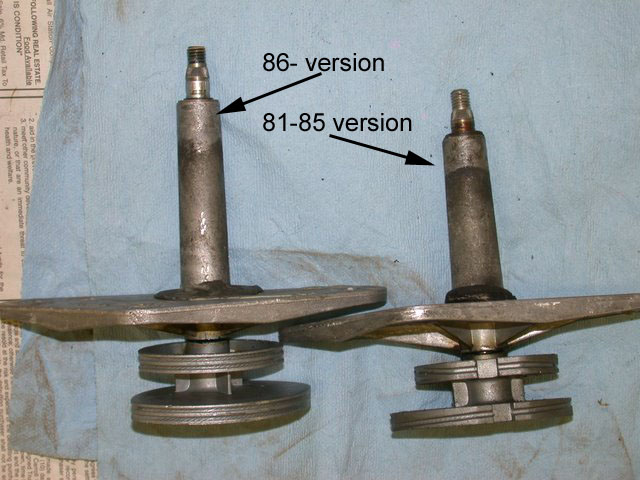
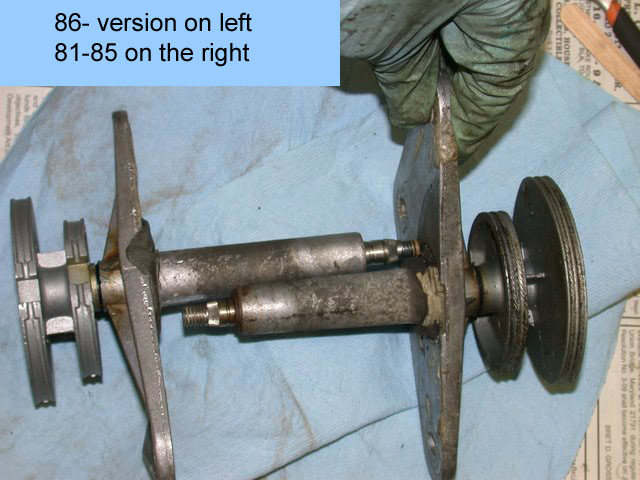
The length of the wiper drive grew to accommodate the deeper cowl beginning in 1986.
Troubleshooting
Most of us are familiar with the part-swap method of trouble elimination.
It is an expedient but often inefficient approach. You most likely agree with me
or you would not be here. You don't need a repair manual or a web page to swap three parts.
A second shortcut method requires a compiled list of symptoms and their likely causes, gleaned
from other owners' experiences. I've had relatively few wiper problems, so can't pass on many
here:
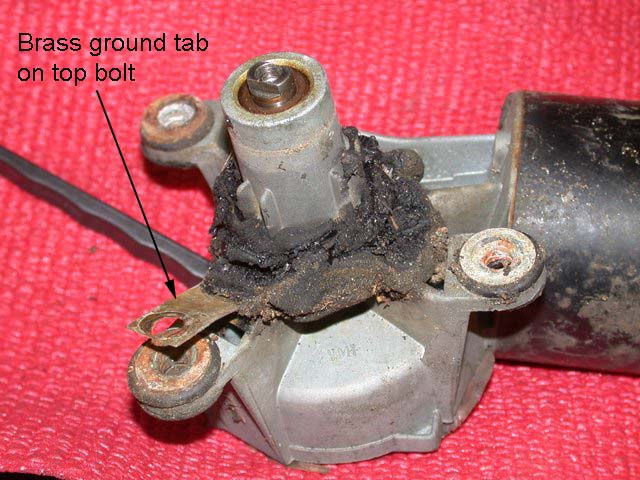
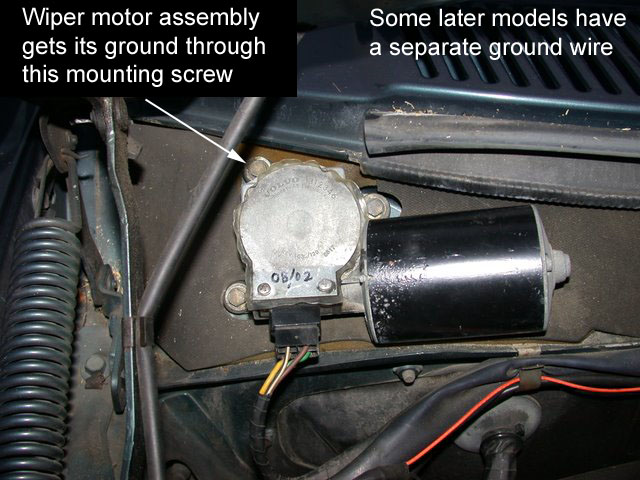
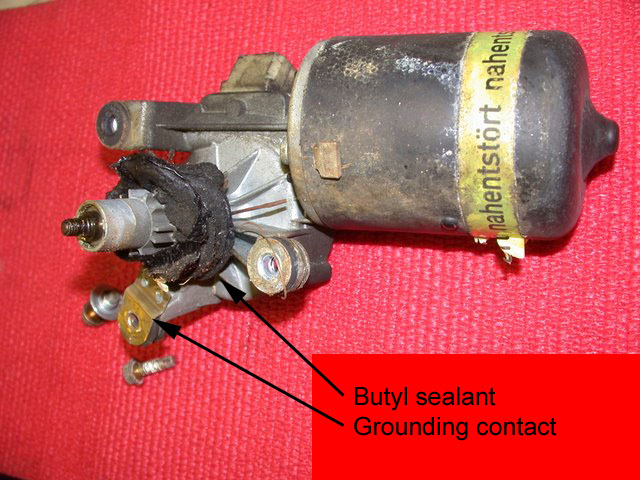
There are two important ground connections not made through the wiring harness!
The main ground is through a tab hidden behind the motor unit making contact with the firewall through a mounting bolt.
Everything grounds through this tab, so if it is dirty or corroded nothing works right.
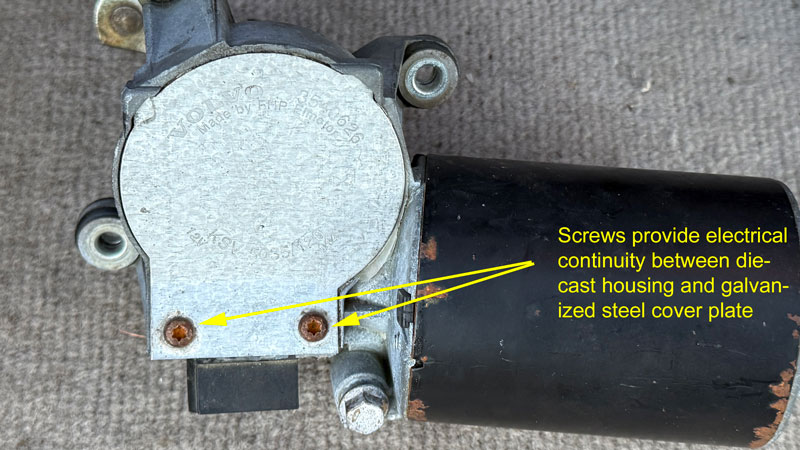
The second important ground circuit is the motor brake using the sheet metal cover in its path.
Wipers dead - dirty ground contact at motor; corroded fuse #2
Motor slow and makes grinding noise - Electrolux field magnets unglued from case
Motor slow and wipers making clunking noises - wiper drive bound up
Wipers stop in mid-sweep when turned off - parking contacts need cleaning
Wipers do not sweep, but motor runs with cyclic sound as if wipers should be sweeping - wiper drive pulley loose from shaft
Wipers do not turn off until key is switched off - parking brake contact is dirty
From Philip Rice: If front or rear wiper keeps running when switched to the "Intermittent" or "Interval" position, check the associated (front/rear) wiper relay.
From 2manyturbos @ turbobricks if wiper sweeps continuously in interval mode parking brake contact (cover plate) could be dirty.
Trading time for money, you might choose instead to understand the system, allowing a
divide and conquer approach to repair diagnosis.
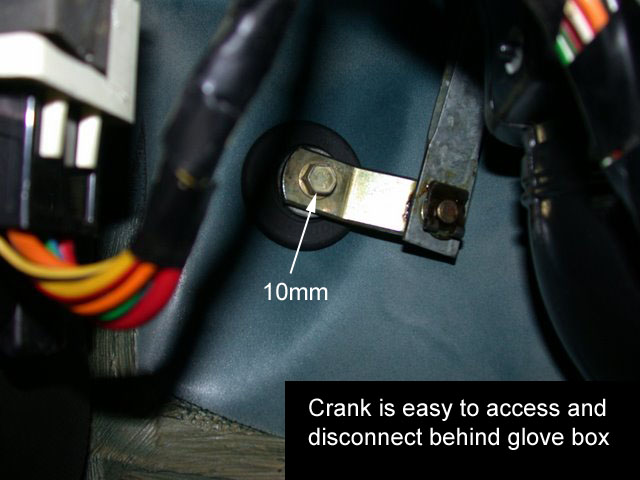
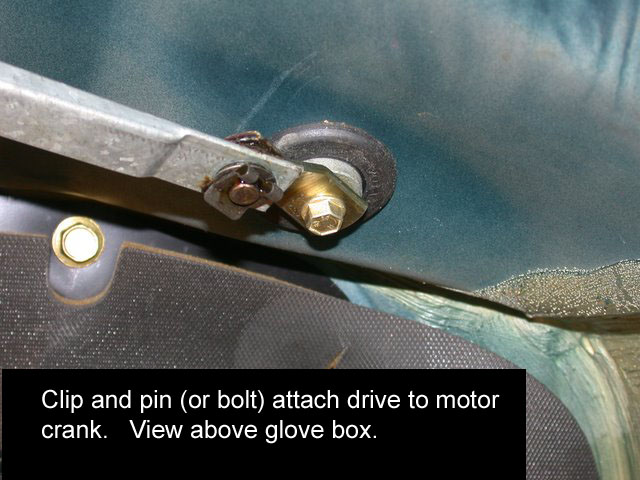
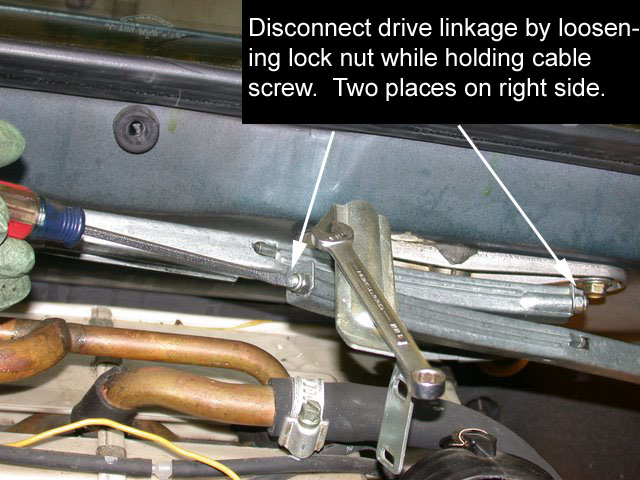
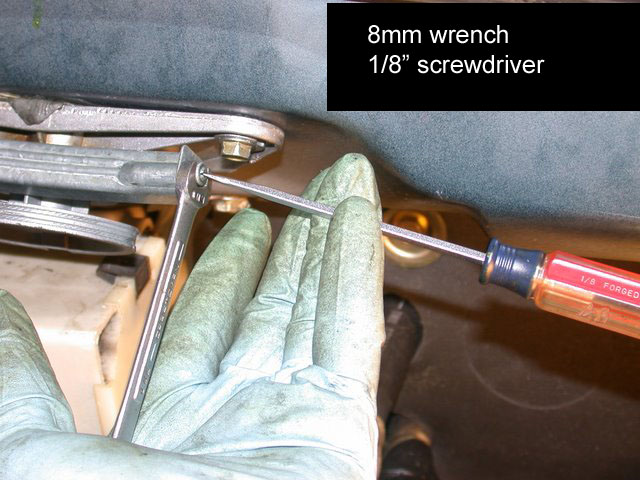
For instance, a basic division between mechanical and electrical can be made
by disconnecting the wiper's drive crank from the motor, directly
behind the glove box.
Take note of the keyway.
The following images should shed some light on the design and function of the 240
windscreen wiper, along with a couple links to more information at other sites.
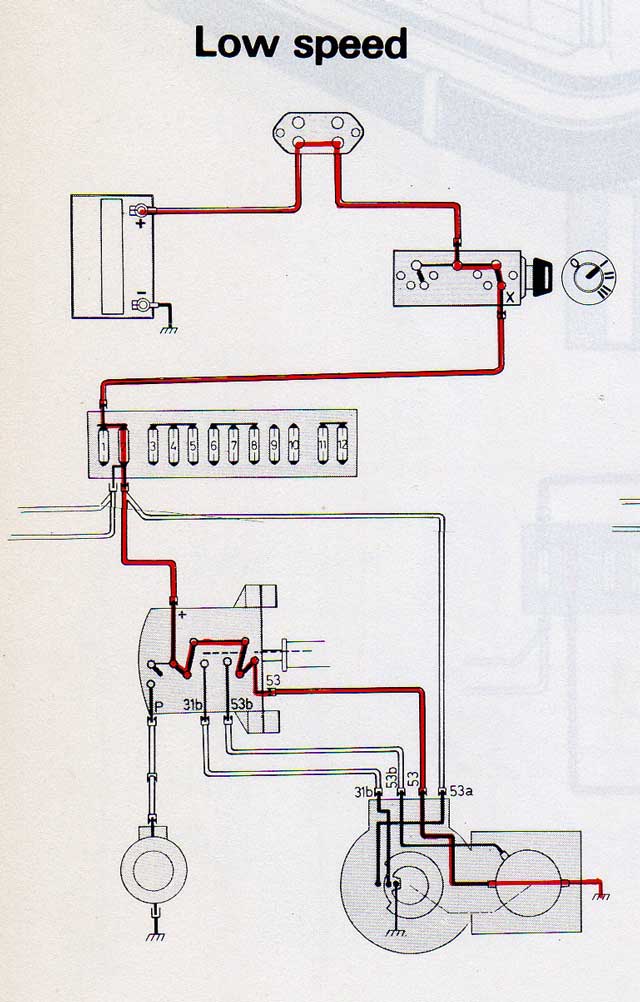
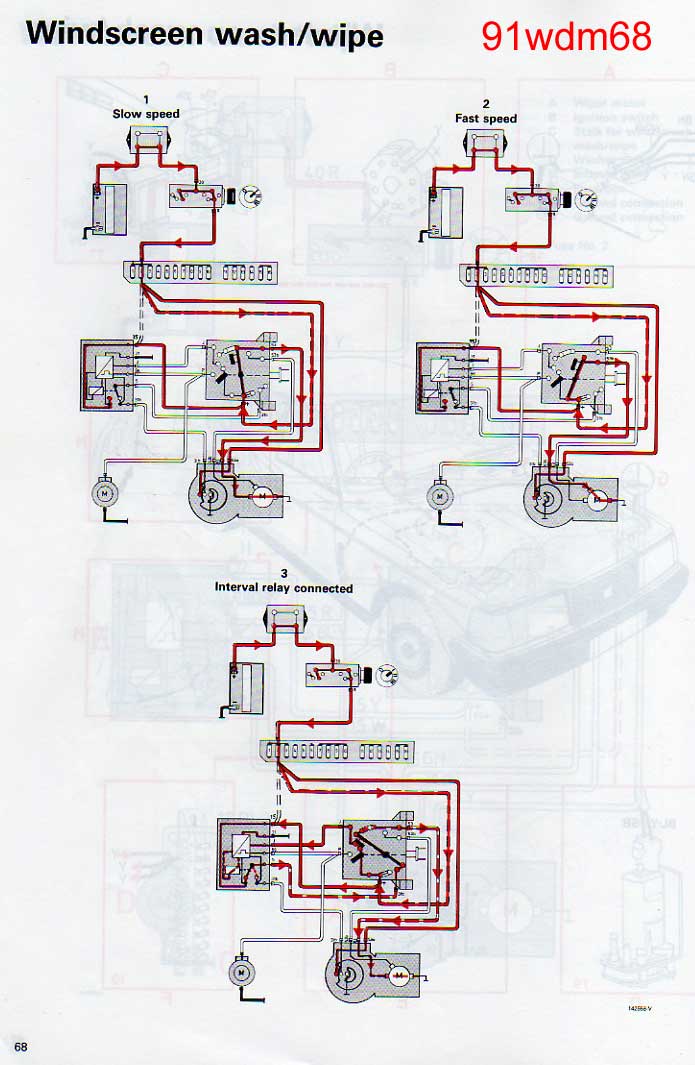
Electrical Function
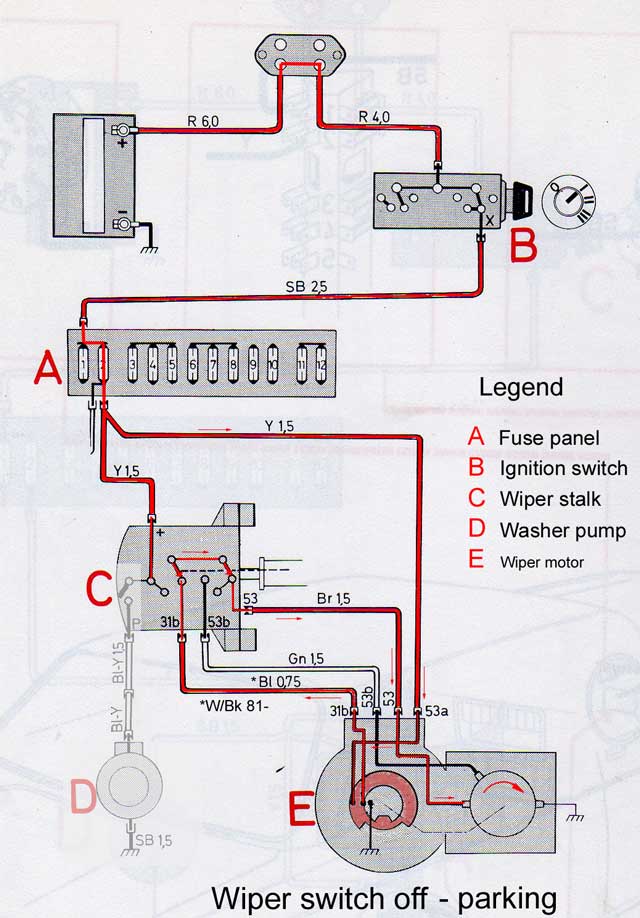
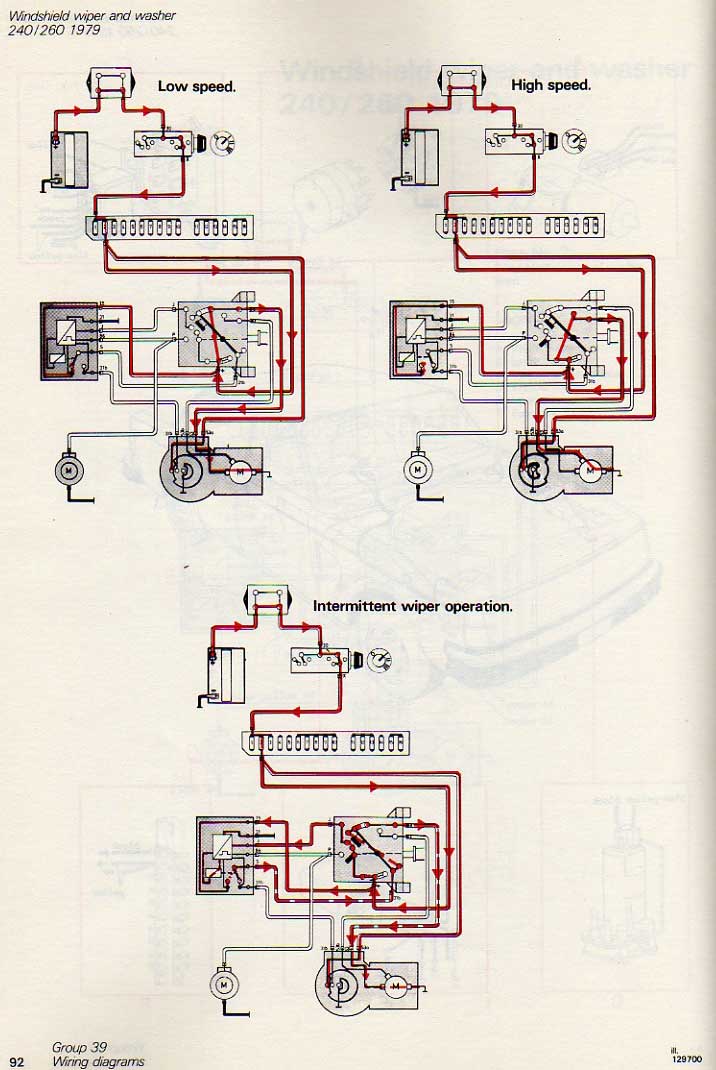
There are two paths to power the wiper motor, normal wiping done with the switch
in Low or High, and the parking sweep, used when the switch is in Interval or Off.
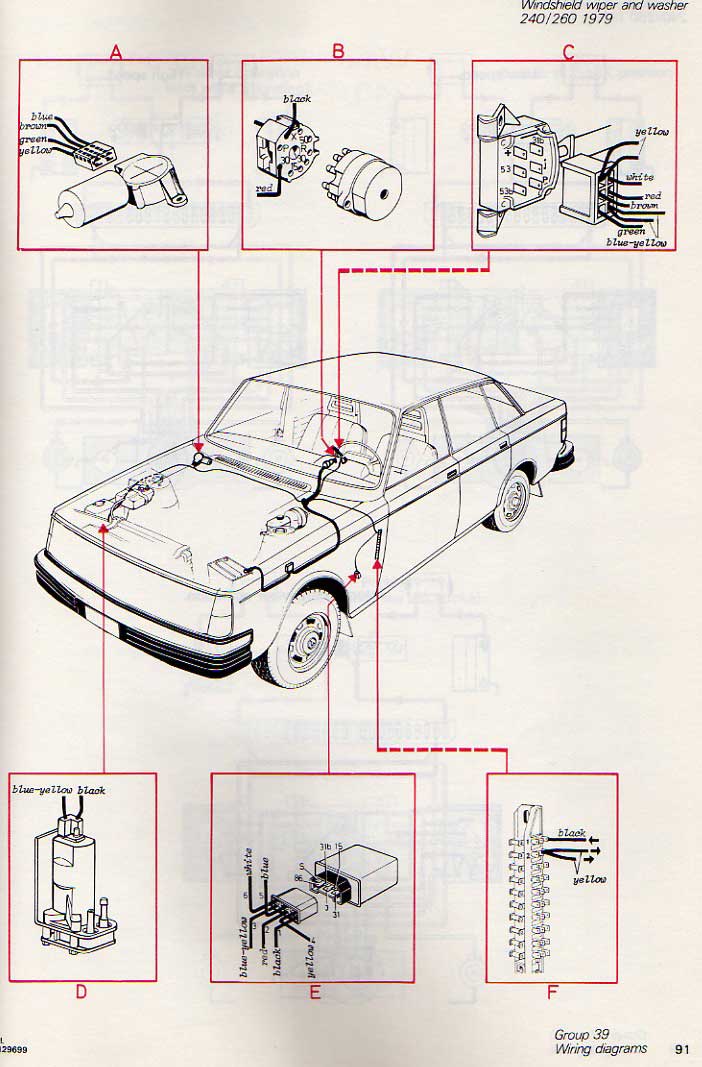
Using the early, non-intermittent (no relay) wiring diagram, the two paths can
be followed.
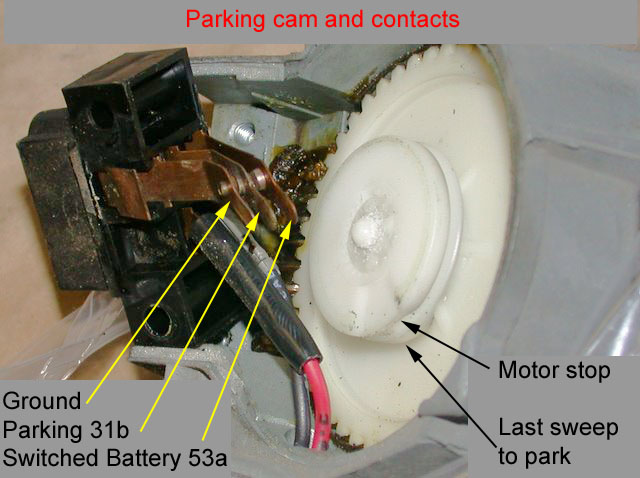
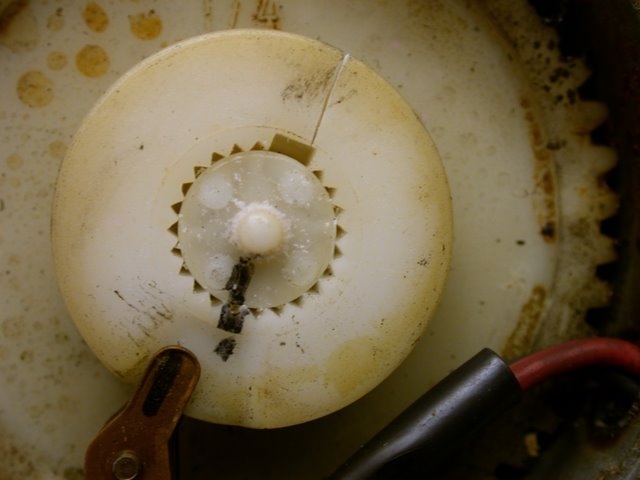
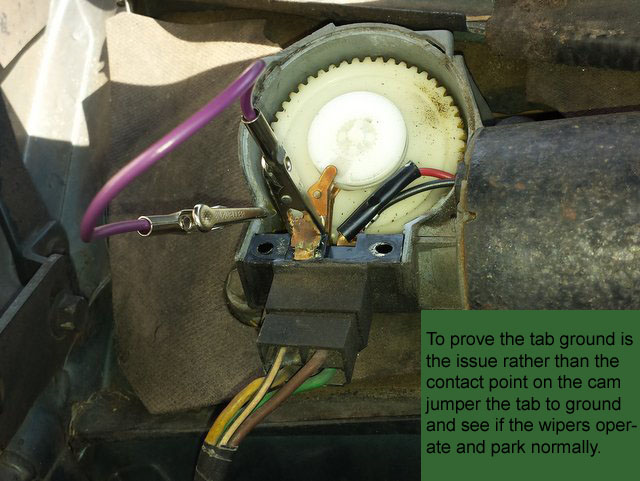
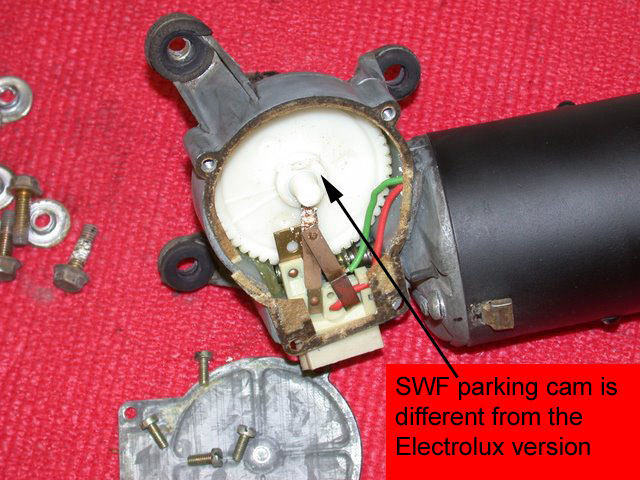
Parking cam used in the Electrolux wiper motor.
Note the ground contact operated by the parking cam acts as a motor brake
at the close of the parking sweep.
This wiping and parking function is 1950's technology.
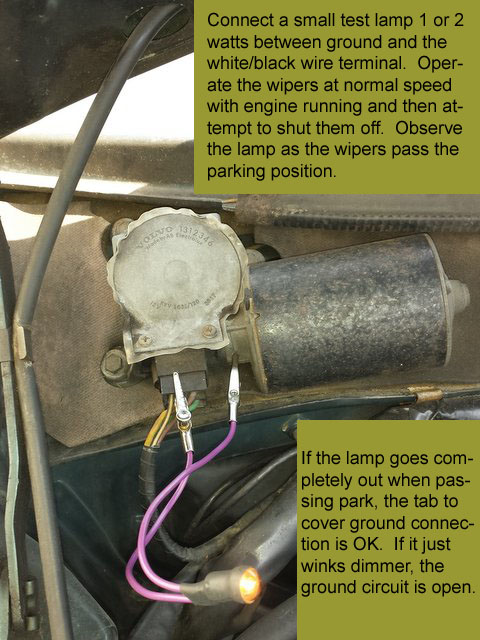
Without disturbing the possibly poor connections, you can check this using a test lamp.
When the motor brake fails, the sweep is repeated -- but not always. If you test with a dry window or without the engine running, the lack of momentum or increased friction could make it look like the brake is working.
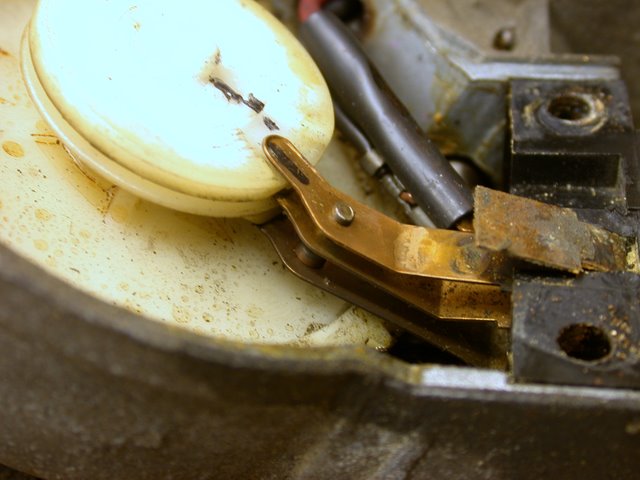
This next photo shows how you can convince yourself of the need for that motor brake ground path. A piece of masking tape is preventing the brake from taking effect.
Proof of the brake function can be seen by removing it purposely.
This bit of corrosion due to dissimilar metal contact did not completely stop the wipers from parking when shut off
from either speed. But the delay setting for intermittent wiping didn't work. The wiper skipped the delay and moved
right into the next sweep because the motor brake failed to stop it in time.
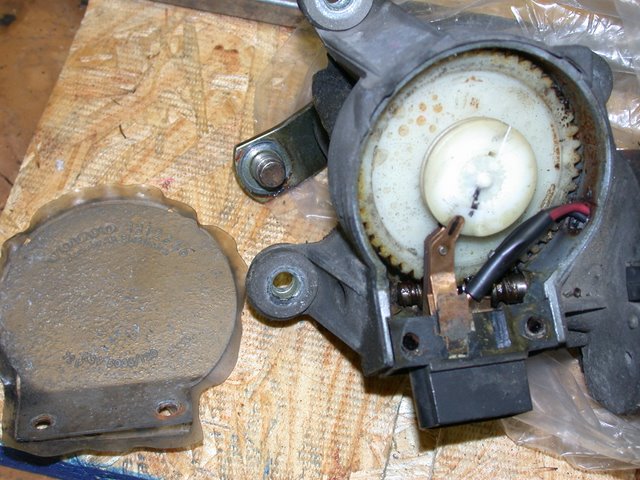
Photo courtesy of 2manyturbos @ turbobricks.
The use of Torx fasteners tells me this is a later build. Photo courtesy of 2manyturbos @ turbobricks.
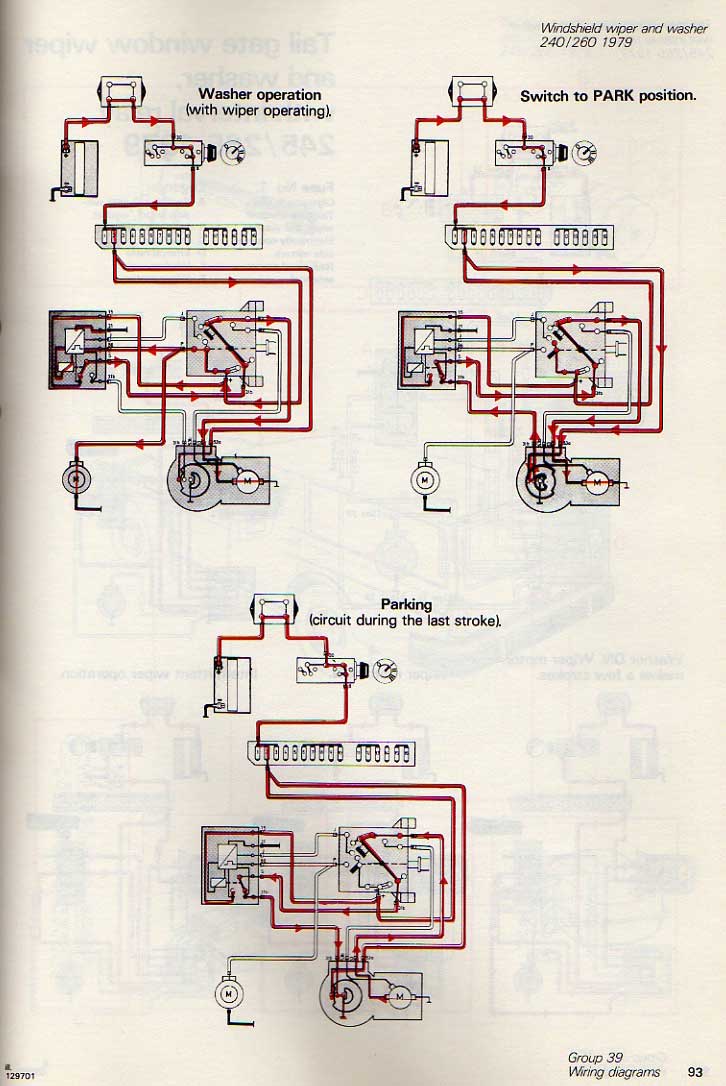
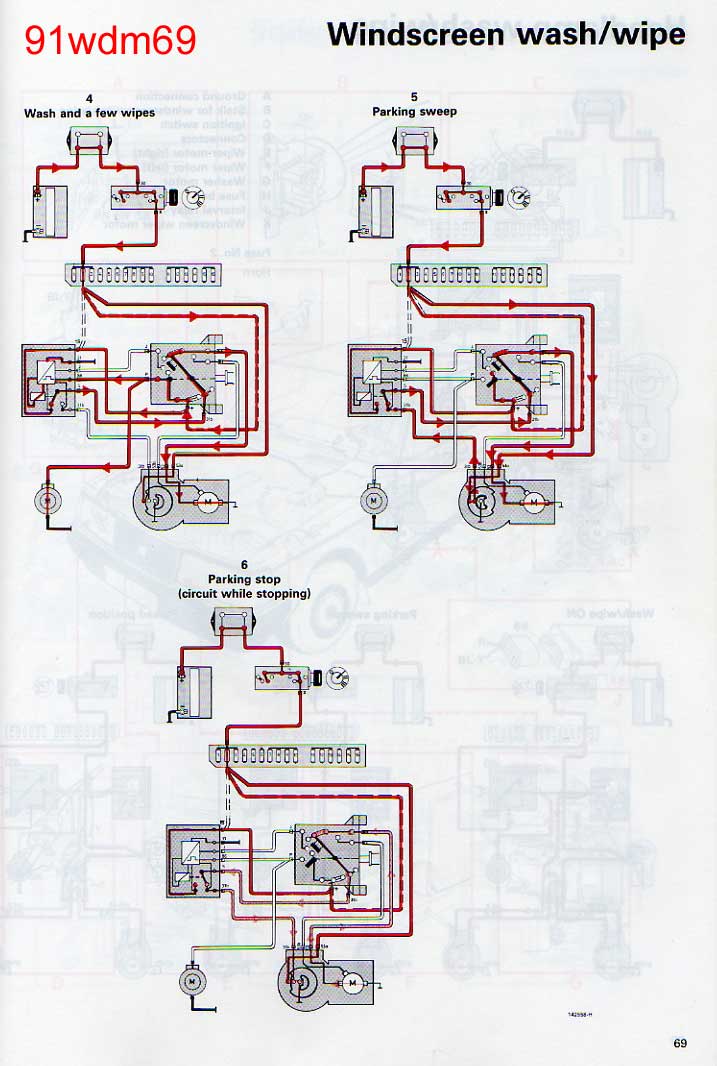
Adding the interval function, with its relay, makes the diagram
a bit more crowded and takes us into the 1970's with transistors.
Tailgate wiper drawings included here, although I have not yet had occasion
to do much more than change the blade on our one wagon.
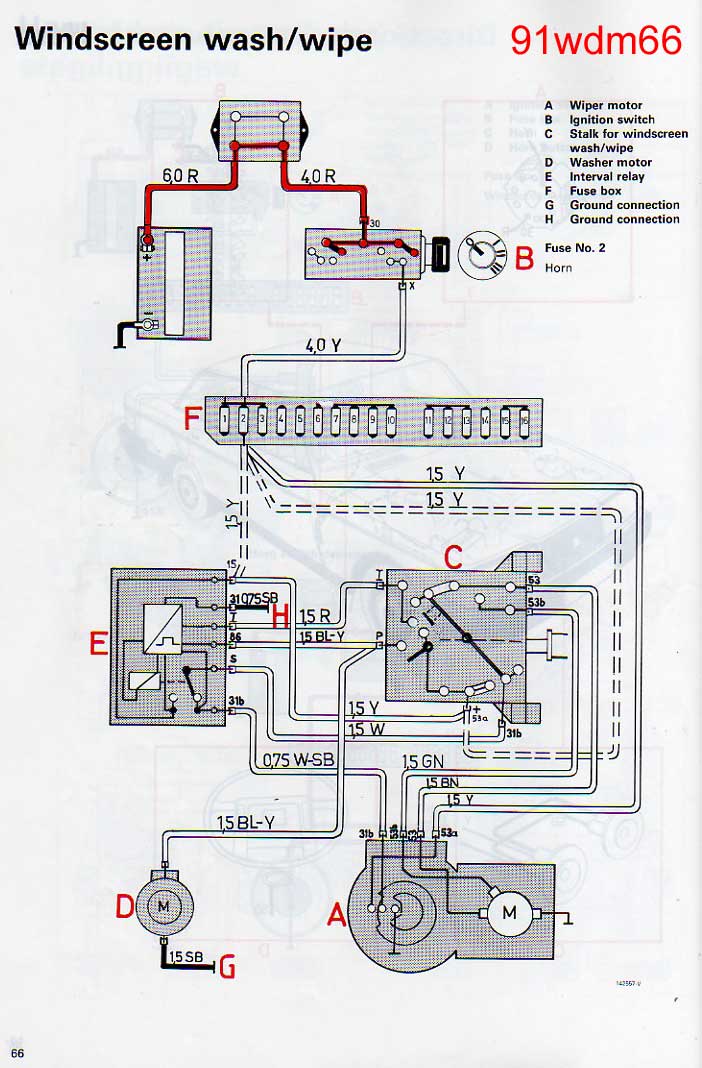
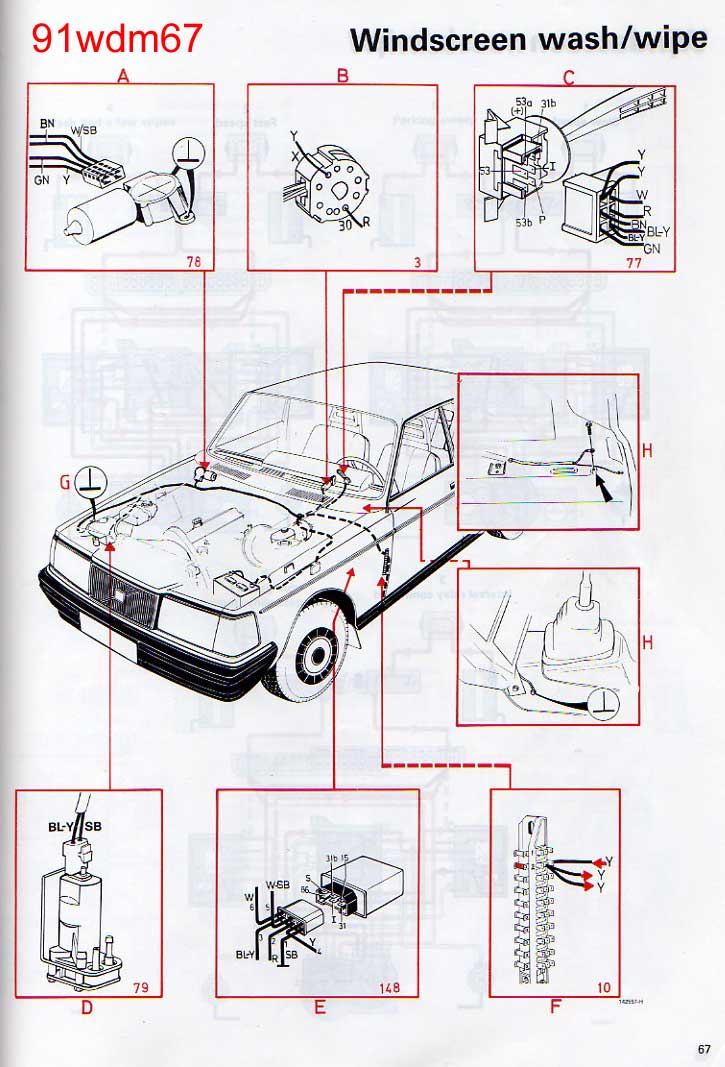
Jumping from the seventies to the nineties, not much more than a wire
color and harness routing has changed the wiring diagram:
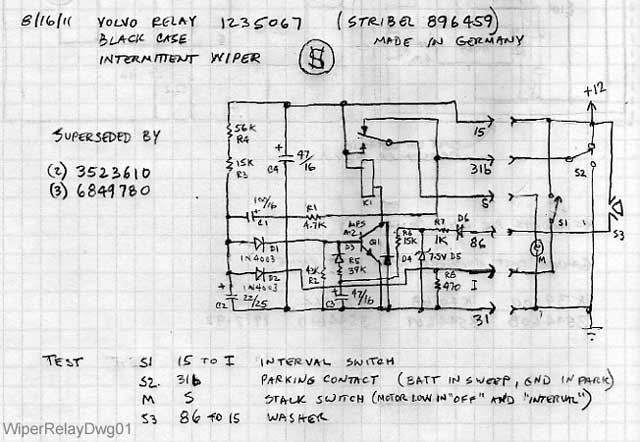
For those interested in the Stribel version of Robert W. Kearns' 1964 patent:
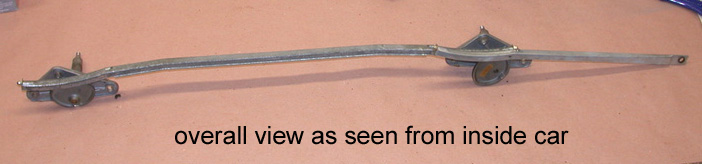
Mechanical Function
So far, I've only experienced loose magnets in two Electrolux wiper motors. This
happened long before I had the idea to take photos, so what I recall of the repair is
but a vague memory of having cleaned rust from the inner case with a wire brush, and
mixed up a batch of epoxy to put a thin layer between the cleaned metal and the magnet.
I later had second thoughts about the choice of epoxy (thermally brittle) but have had no
reason to revisit the repaired motors (one still in use).
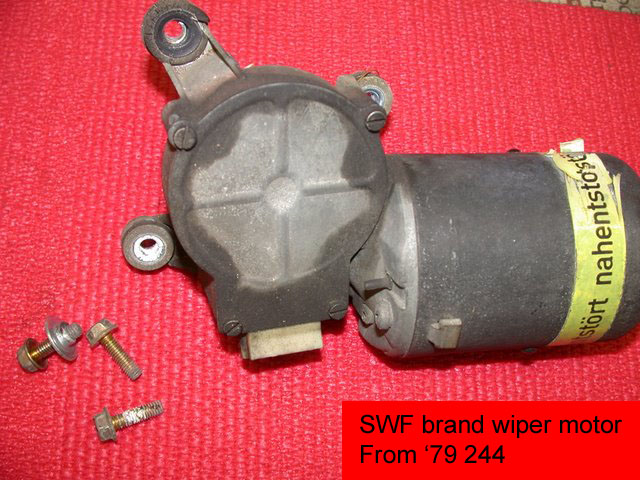
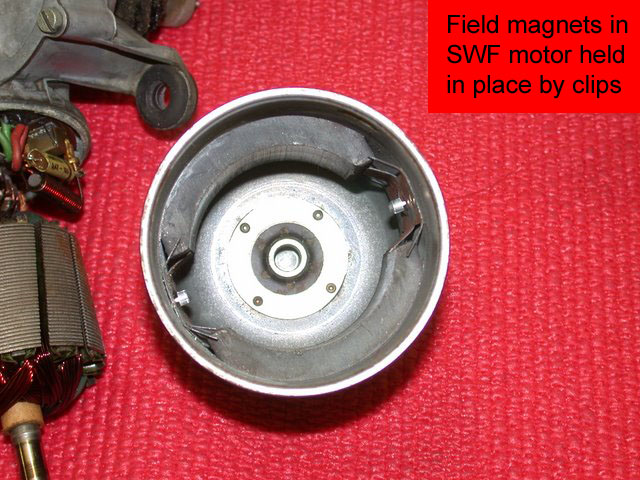
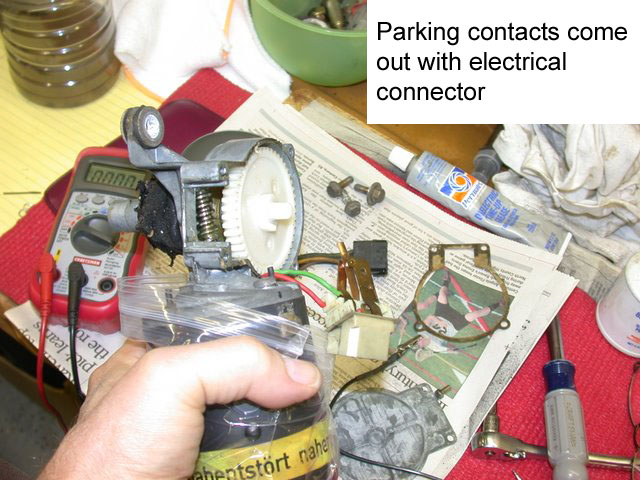
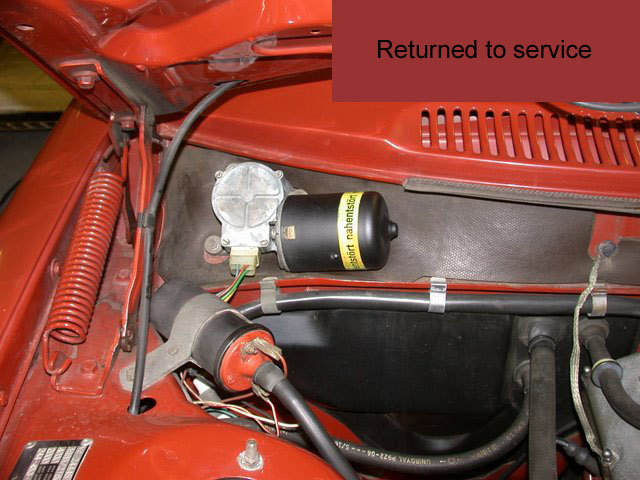
The SWF motor doesn't get loose magnets, I suppose, because they are held in place by
clips. Here are a few views of a repair to clean and lube the SWF when it seemed slow:
Though German is my second language, I had no clue about "nahentst�rt." Of course,
Google scratches most itches,
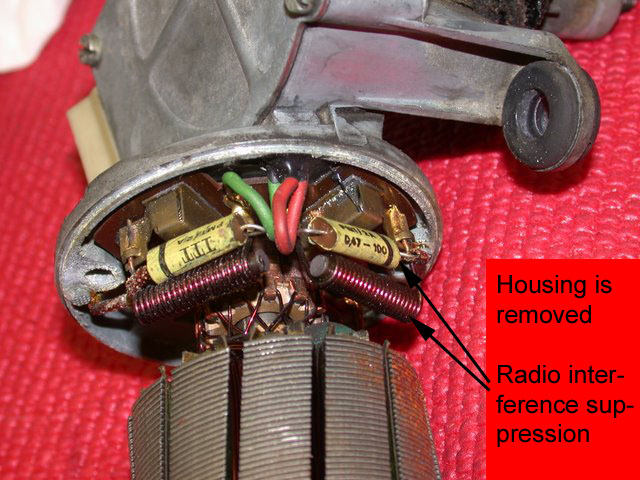
so I'm quite happy to know the radiated electrical noise
from my SWF wiper motor's brushes is adequately
suppressed -- nahentst�rt.
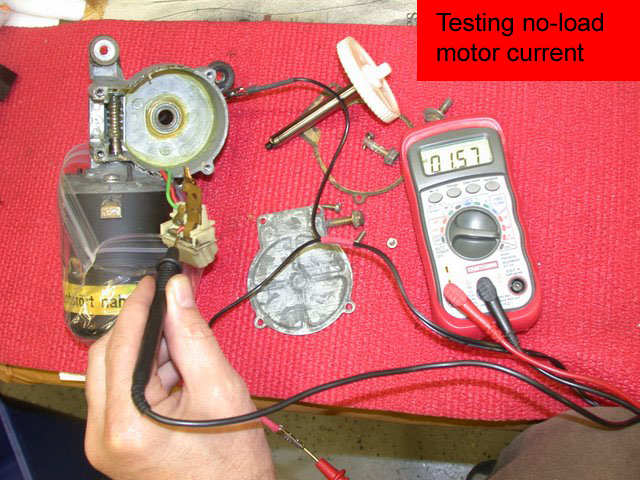
Just for reference, the unloaded motor current was about 1 and 1.5A on low speed and high, respectively.
Each measurement increased about 1/2 Amp with the gear installed, but unloaded by the mechanism.
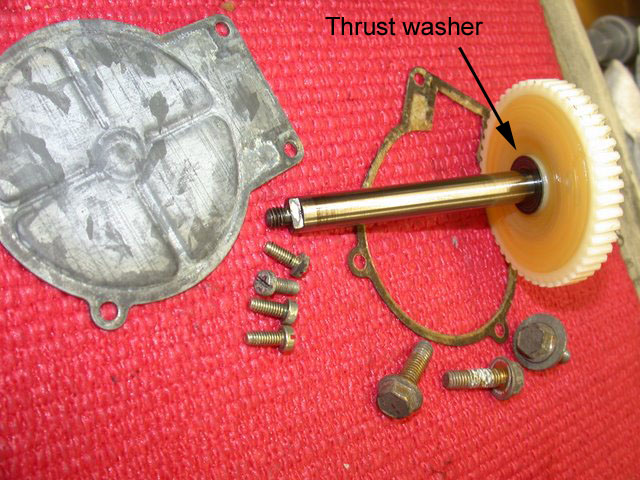
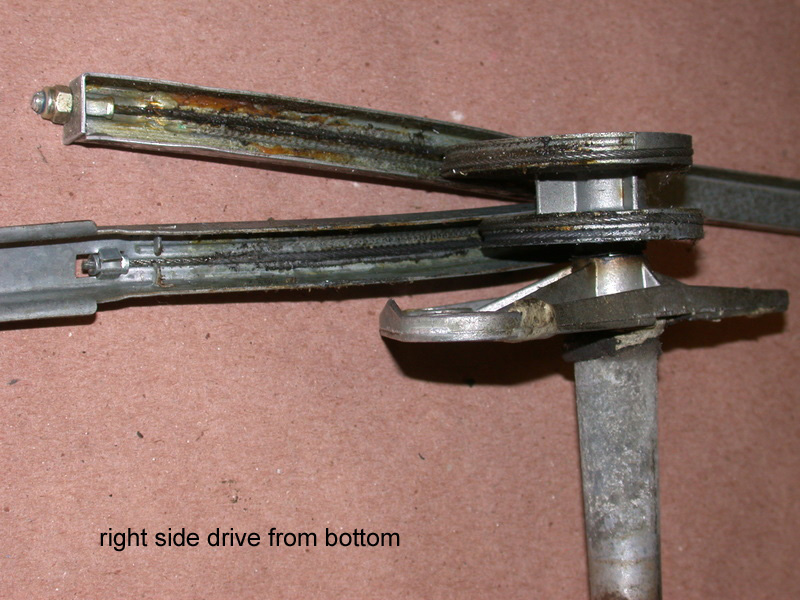
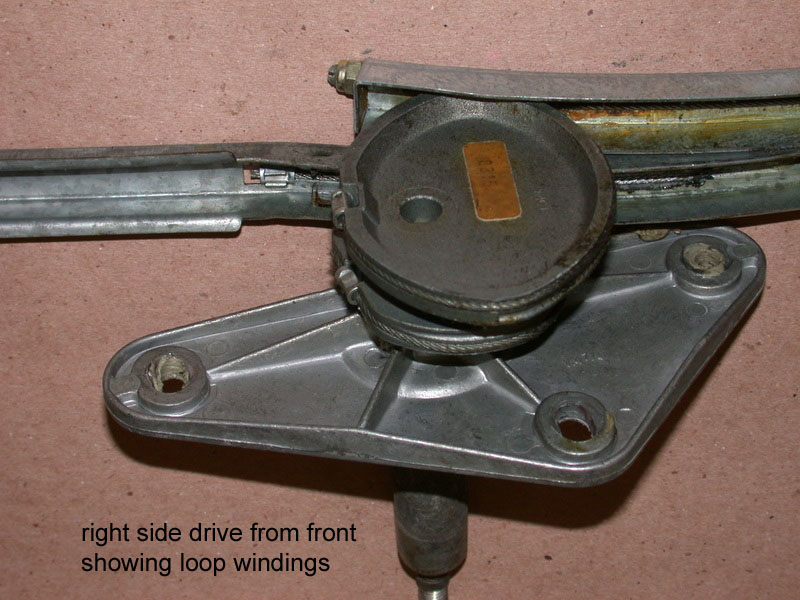
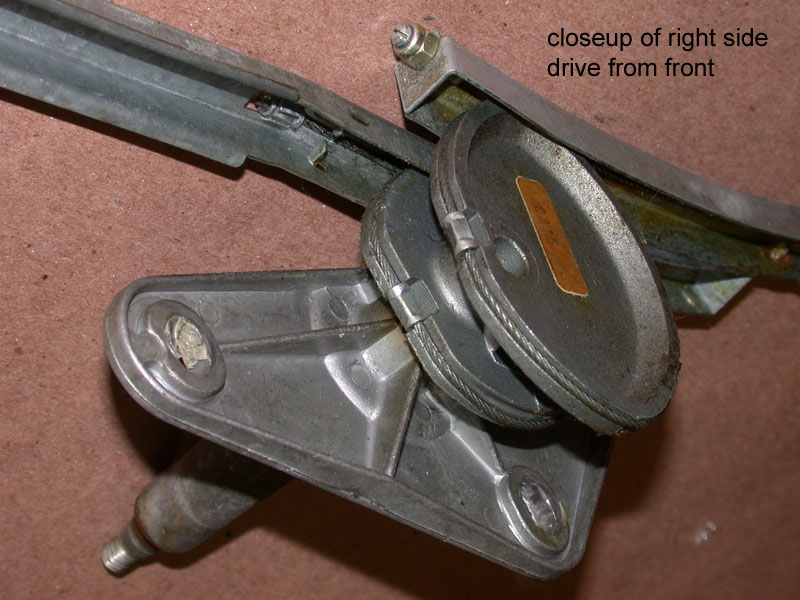
Repairing a nearly frozen drive on the '89 wagon was a bit more involved.
As I pulled the car into the garage, I wondered if the linkage was loose
and the wipers were dragging on the glass. Looking closer, I could see the cowl was flexing in
sync with the clunk noise as the crank reversed direction. The dragging noise was not wiper on glass:
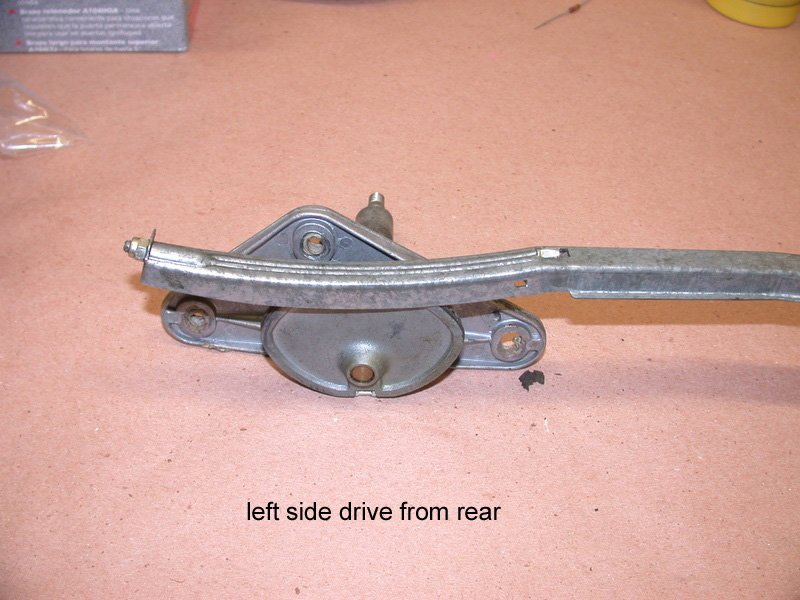
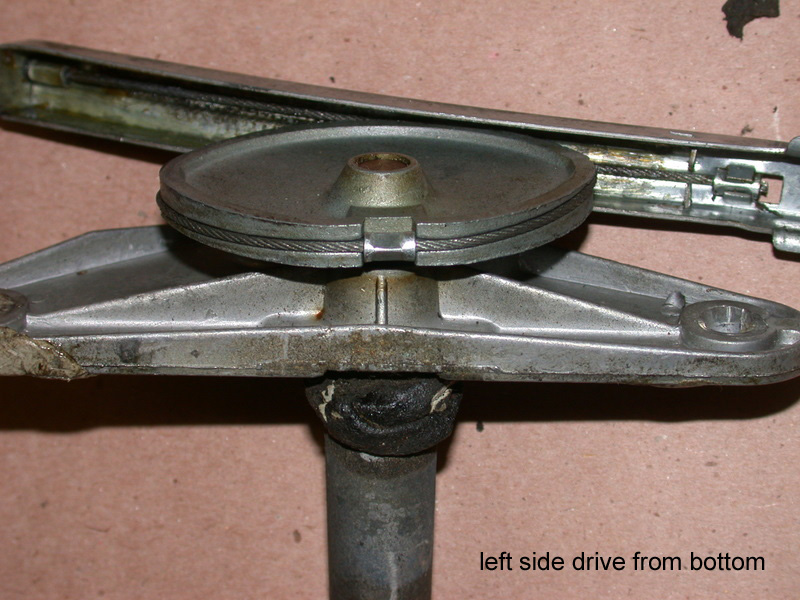
With the crank disconnected from the motor, I could not move the linkage by hand.
Reconnecting it, now thoroughly impressed with the torque delivered by that gearmotor
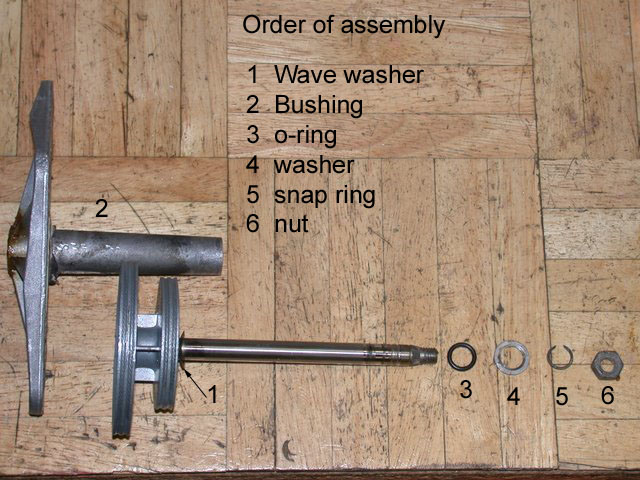
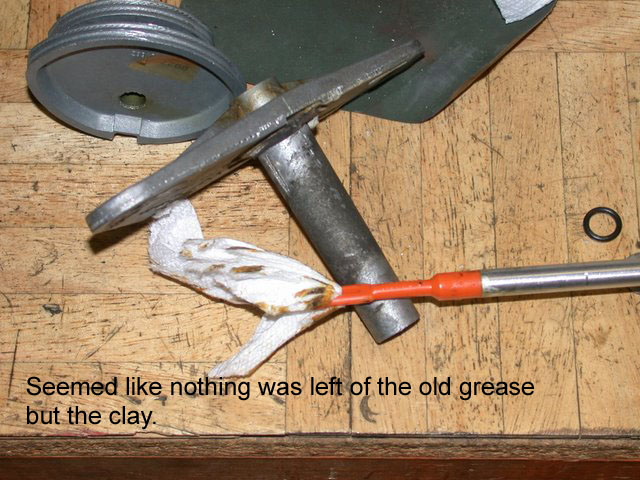
I removed the o-ring seal to flood the shaft and bushing beneath it with penetrating oil,
hoping the motor would work it into the drive.
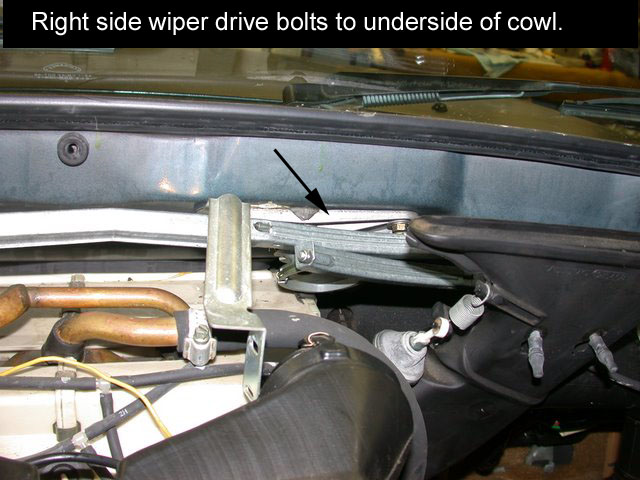
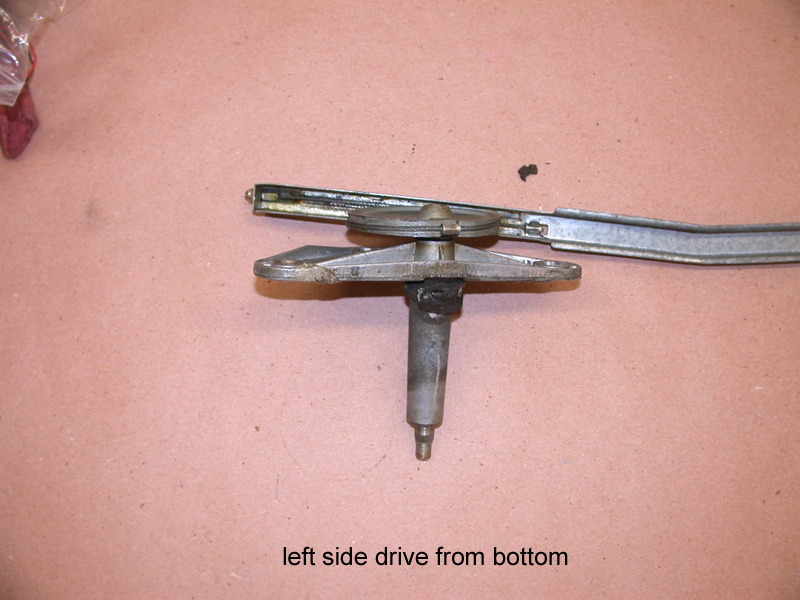
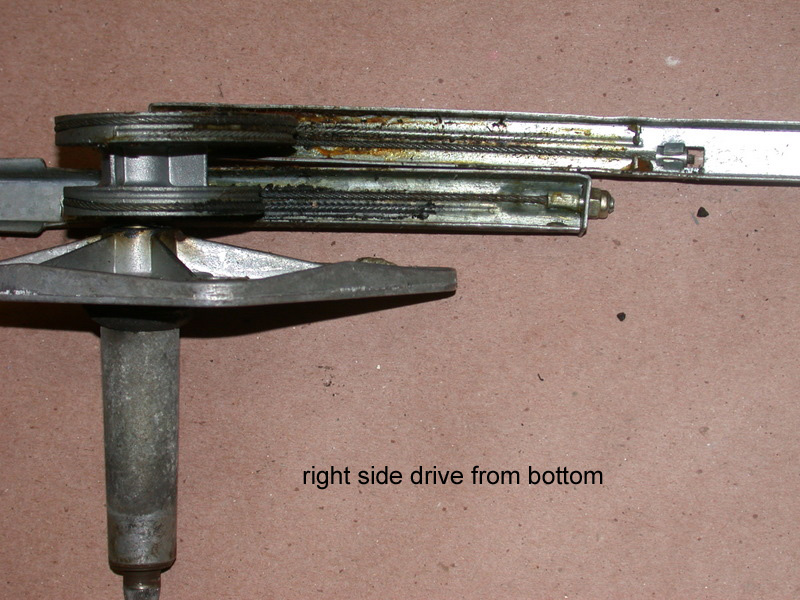
It was soon apparent the drive would need to come out
and be restrained against my efforts in a more secure way than its mounting to the firewall.
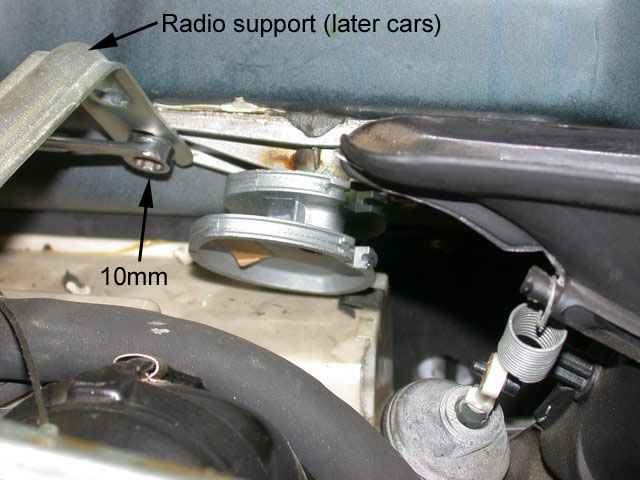
I have read some claims the drive can be removed and replaced with the dash in,
the access is through the glove box opening, the upper radio opening,
and the instrument cluster opening. The arm scraping didn't seem like it was worth any saving of time
and with those holes already open the dash is only 7 more screws:
Dash-out and Dash-in Details
Aside from that good-enough reason, how could I get photos?
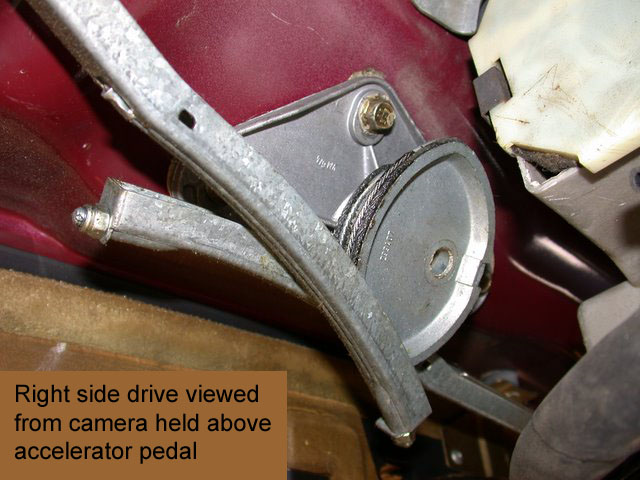
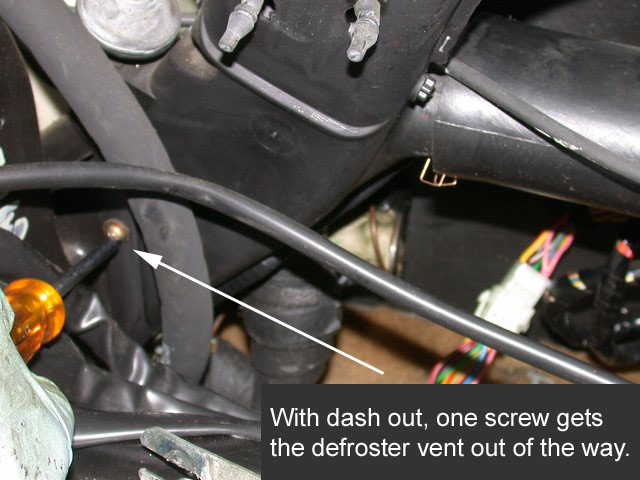
On the other hand, another opportunity arose and I did succeed in repairing a wiper drive through the glove box opening:
The defroster vent is right behind the right-side wiper drive. Easily moved.
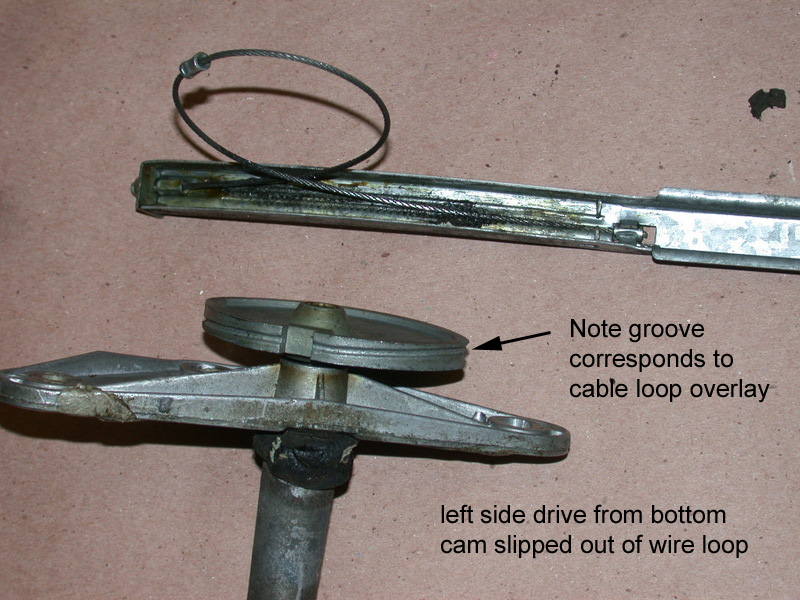
After disconnecting the linkage, I could barely move the drive with a gloved hand
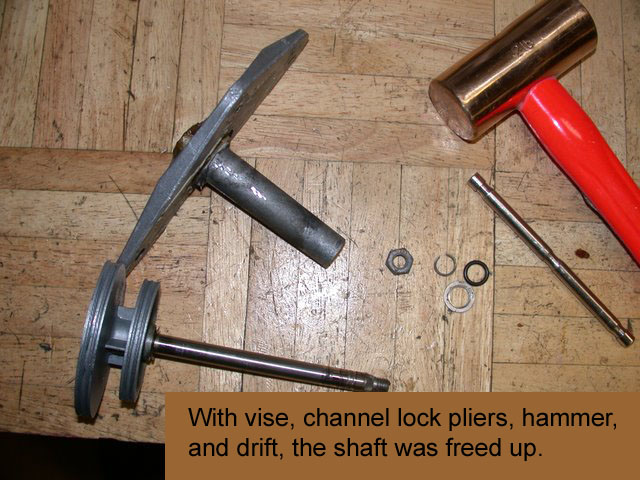
over the cable pulley. I was glad to get it to a bench vise.
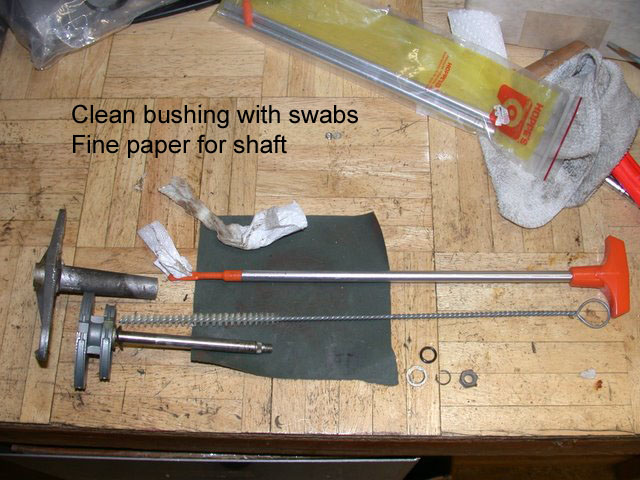
Getting the shaft out without ruining it was more effort than I had expected. My confidence waned
as I discovered the "spare" I had from the 83 would not fit the 89, but it all managed to survive
my twisting and pounding.
Parts
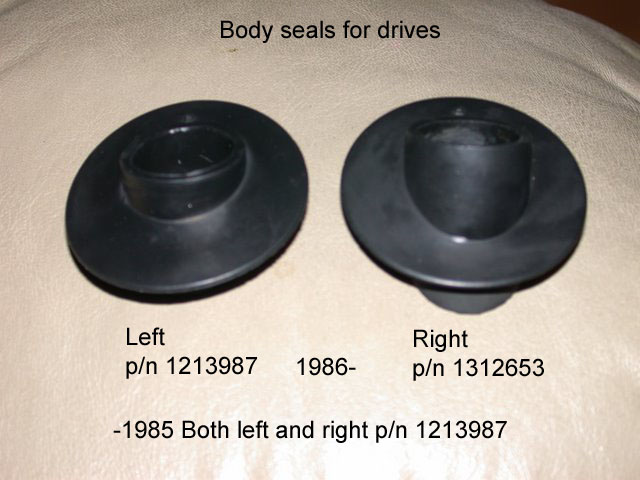
It seems hard to find simple refills any more, except for this most inexpensive brand.
There was only one of these until 1986. After that, there's a left and a right.
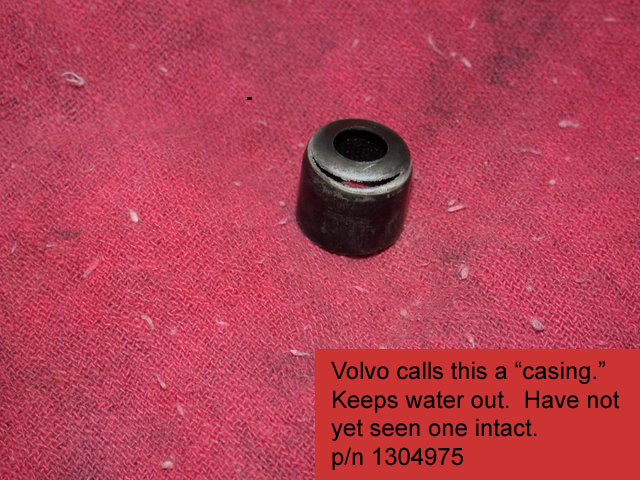
I call this a dust shield in a previous photo. It probably has an important
job in keeping water out of the drive unit.
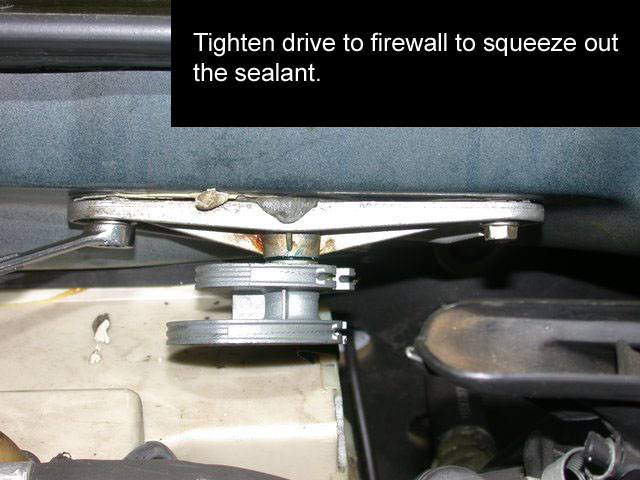
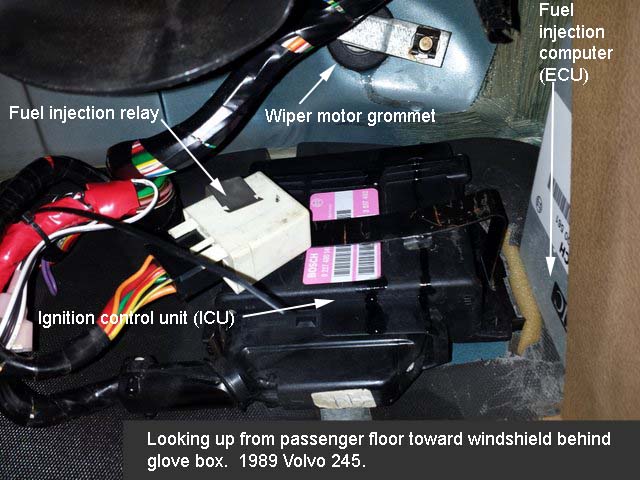
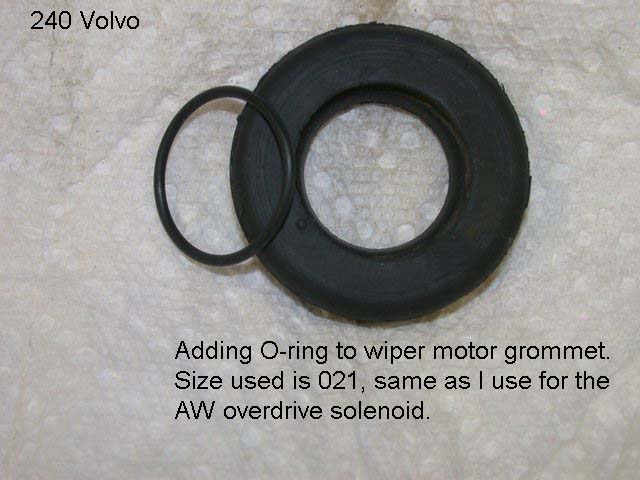
This is about water getting in at the motor. The sheet metal under the cowl vent on the 240
directs the flow of water on the motor's passthrough in the firewall. The butyl rubber seal
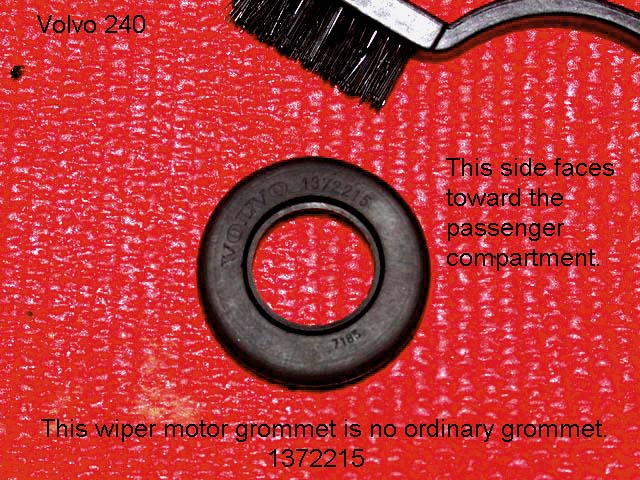
around the motor doesn't do a thing to prevent this. The grommet in the firewall is the only
seal keeping water out of the passenger compartment. It drips right on the EZK ignition
controller in 89+ cars.
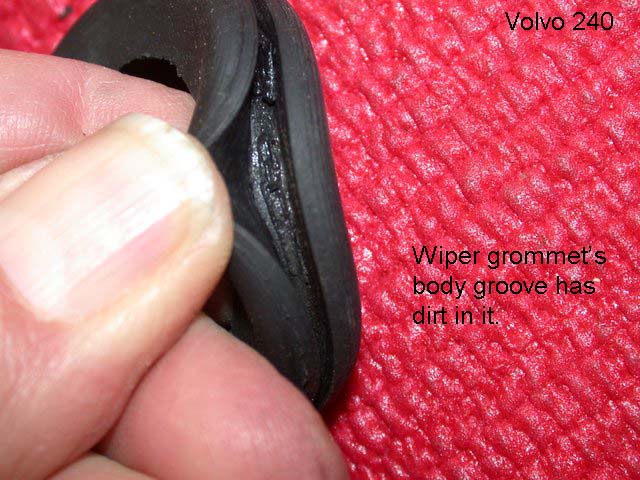
The grommet shrinks with age. Fits tight around the motor but loose in the firewall opening.
I think the proper fix is to replace this special grommet.
With the motor removed, the shrunken grommet floats around the firewall hole.
I've stopped the leak by adding an o-ring.
Must be aging, as I've found the same in 2 89's and a 91.
Some of you who may have bookmarked this page before August 2011
may recall the next series of pictures. These were taken after a 2003
collision left me suddenly with a 1983 parts car. Having the parts
removed made it easy to photograph what normally lives under the dash.
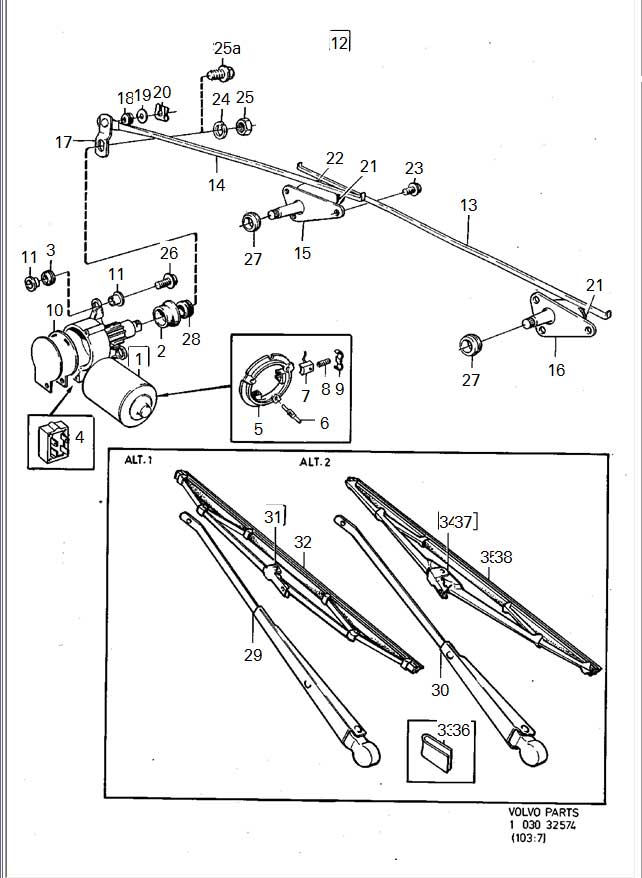
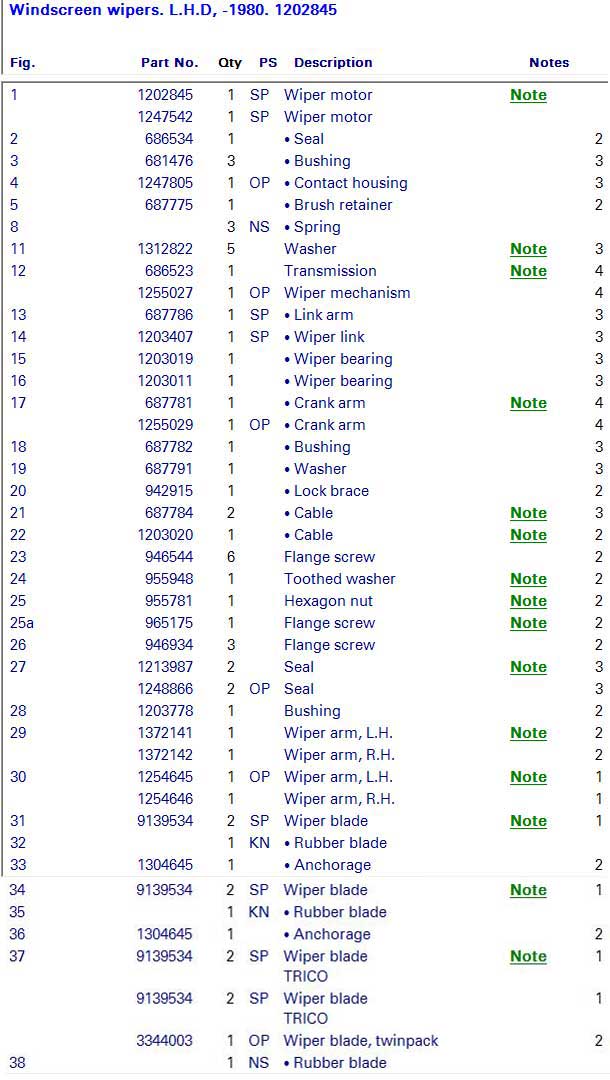
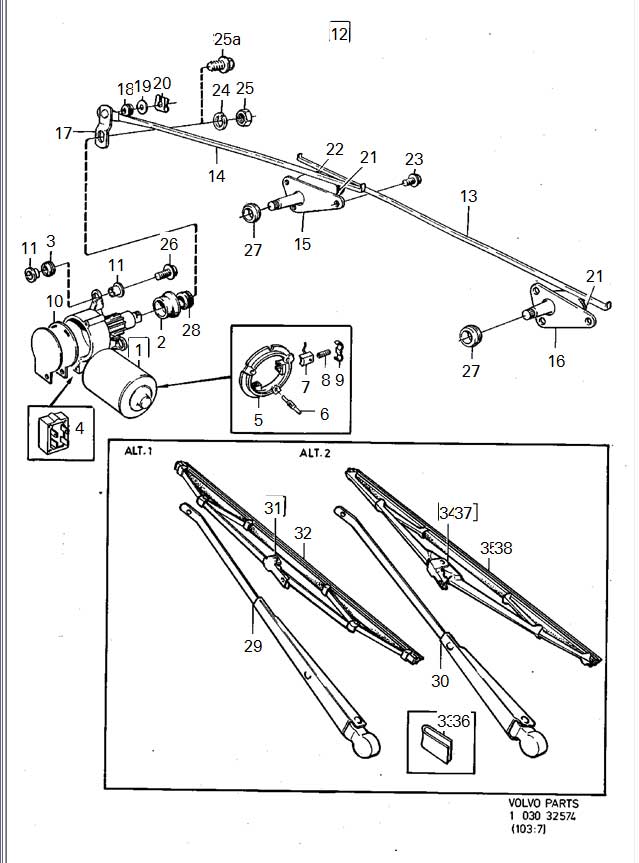
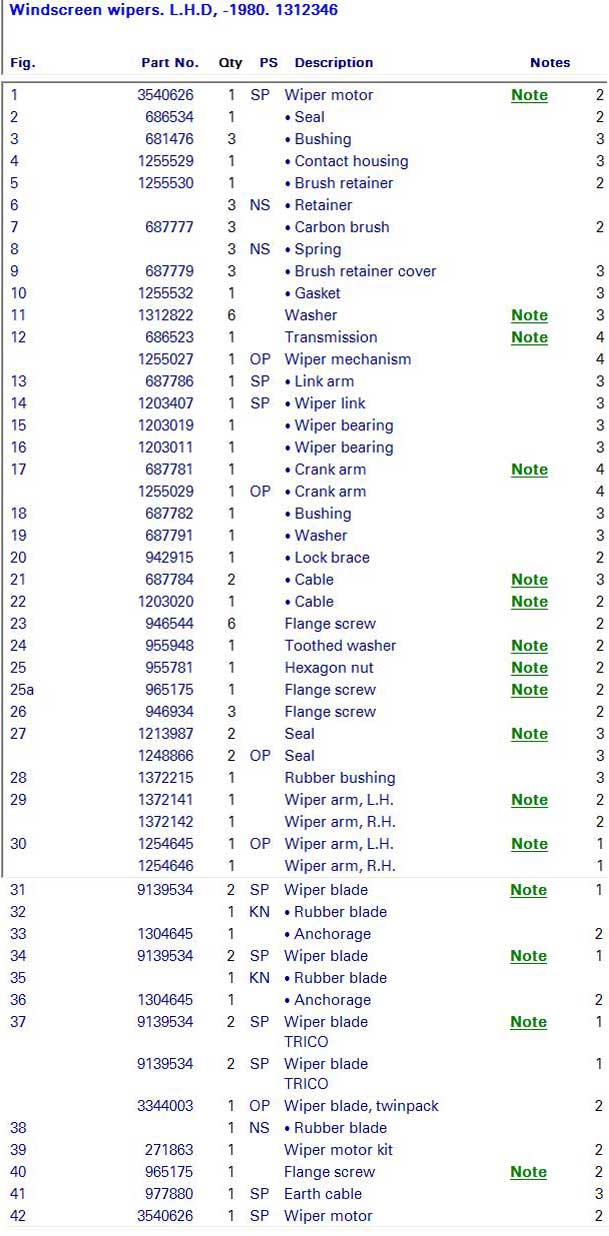
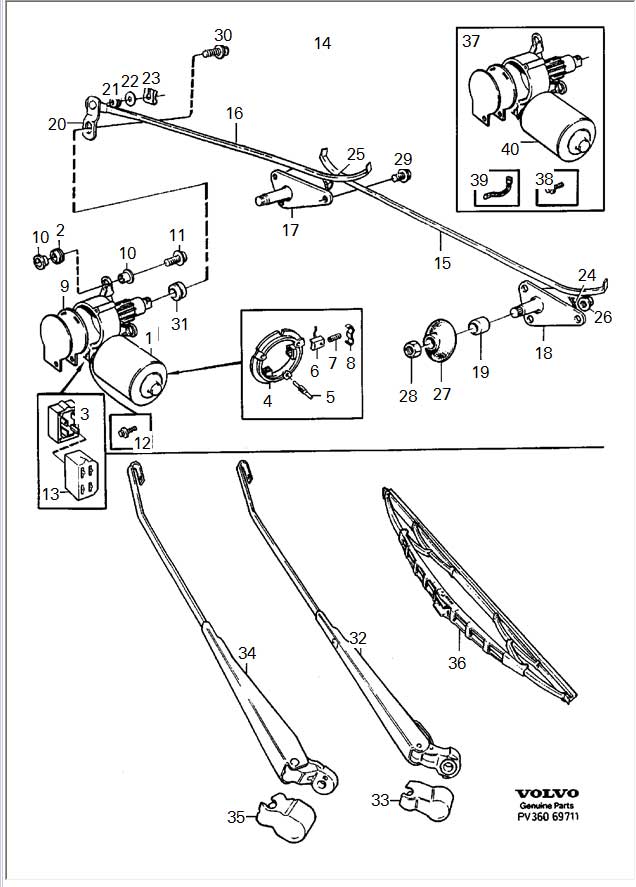
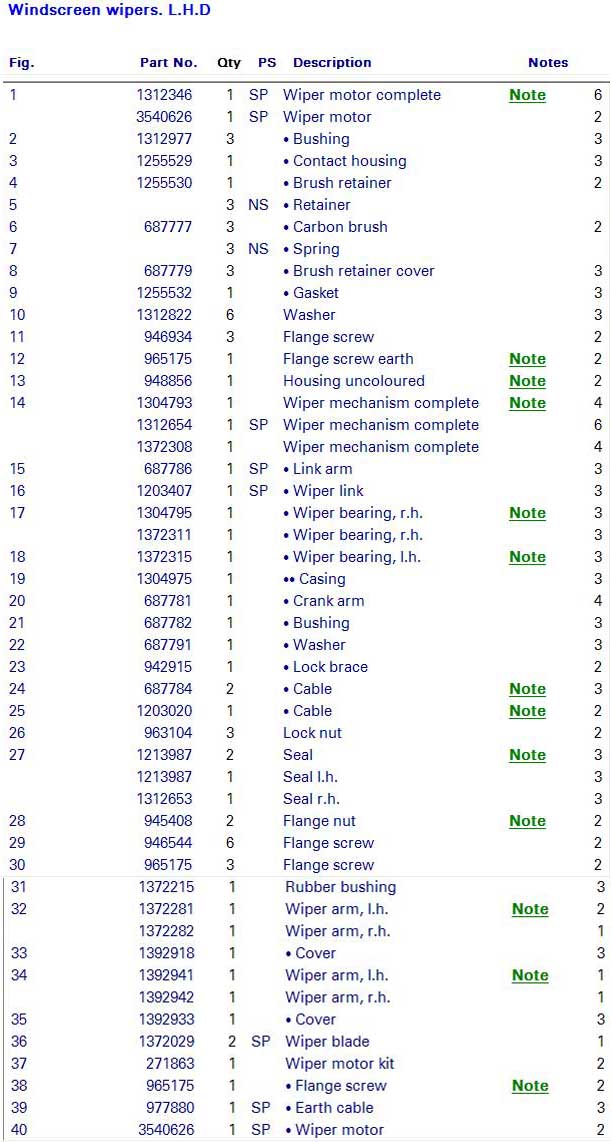
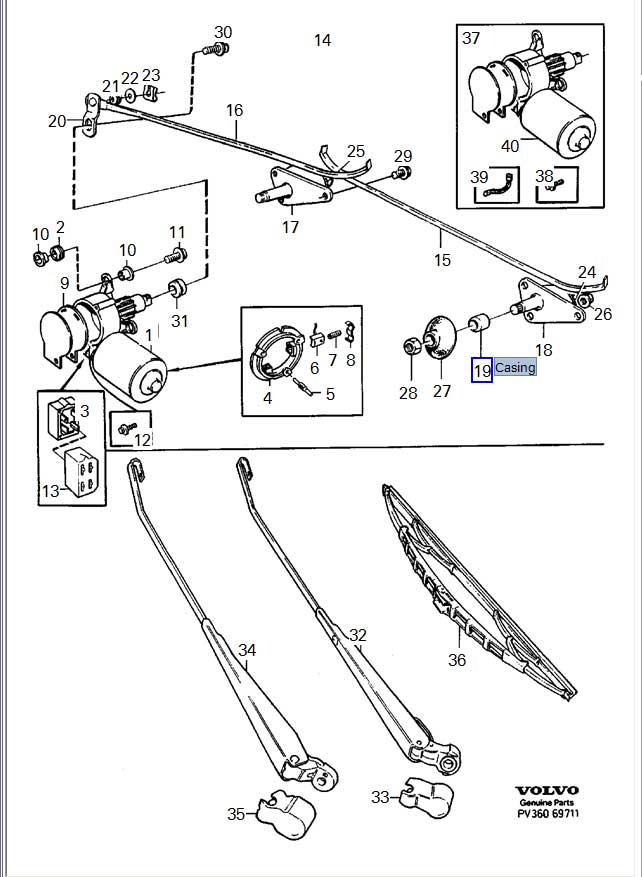
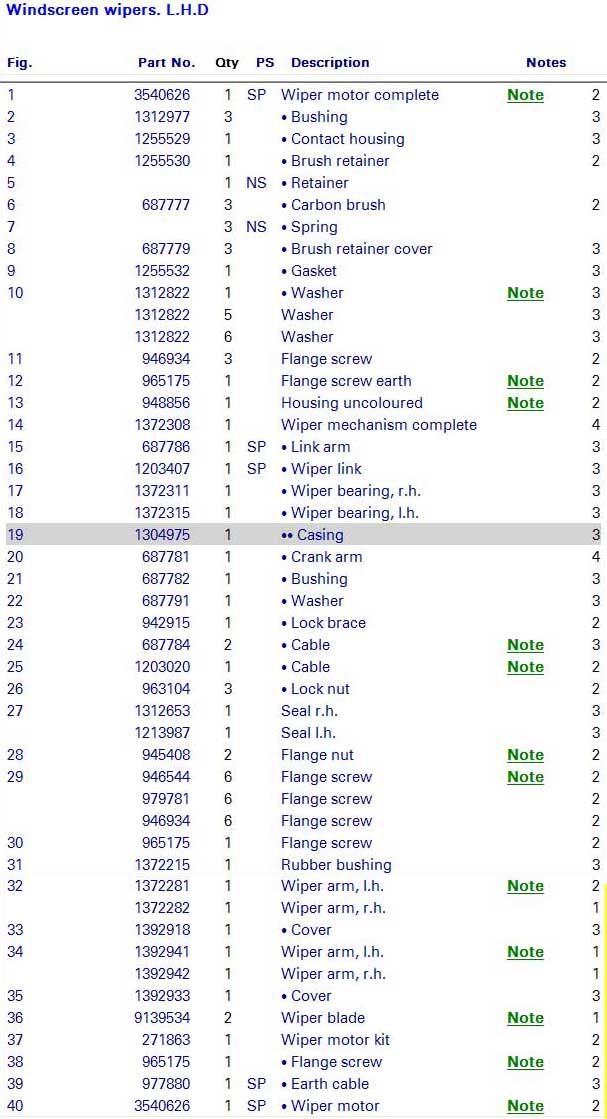
Here are Volvo parts drawings showing the major change years.
The following links are provided as a courtesy, with no claims:
This link is especially helpful if you landed here with a 7 or 9 series car, and
not a 240, however most of the contributions look to be made under an assumption
they are all similar. Brickboard 700/900 FAQ list
This page is maintained by a VCOA club leader who shares some tips on JB-Welding a drive pulley stripped from its shaft: Zen of Volvo 240 Wiper Linkage