2008
Center support bearing and Flex disc, as done on an ’89 200 with M47 manual transmission. This is the first time this car is getting this job done. The car has 300K miles on it and the bearing was just starting to tell me it was time. With this many miles I decided I would replace these additional parts and not just swap out the Bearing. Replacing these other parts is not mandatory for the bearing replacement.
Volvo Part numbers (for the ’89) I know the bearing is different depending on year of car.
The Bearing #183265 this is an SKF # 6009-2RS1 which means it’s a 1.77”ID x 2.955”OD x .63” thick (75mm x 45mm x 16mm) Sealed bearing. So buy it anywhere.
Bearing Carrier or Support Bushing #1221635
Support Spring #683537
Support Washer #682707
Flex Disc #1220843
Things to Note before getting started: My first time doing this job and it took me 2 hours from start to finish.
Driveshaft Hardware: From Driveshaft to the Back of the Transmission requires 19mm Sockets. Torque rating 59 ft lbs/ 80NM
Hardware at the rear axle requires a 17mm and a 15 mm wrench. Sockets won’t fit in there. Torque rating 37ftlbs/50NM
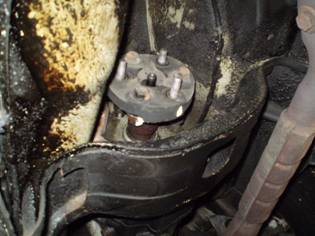
Center bearing Bracket held in with 12mm nuts.
Bearing Carrier: This piece is directional. Look at the 10:00 and the 2:00 position; Note the Larger rubber area on the Left view and the Smaller rubber on the right view. Also note the extra rubber shape on the left view that is not on the right view ( RED Arrow) The Larger faces the Back of the car. (Left picture)


 Large
Large 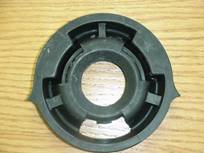
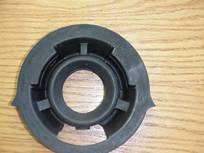 Small
Small
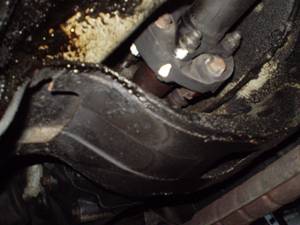
The Crossmember makes it impossible to use just a socket, and adding even a small extension causes interference with the Transmission. To remove the bolts holding the Driveshaft to the back of the transmission (Flex Disc) you would be best to have a Wobble Socket or at least a “U” joint adapter for the Bolt heads that face the back of the Trani.
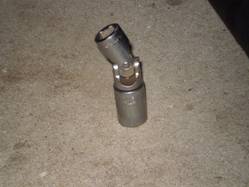 “U” joint added to socket
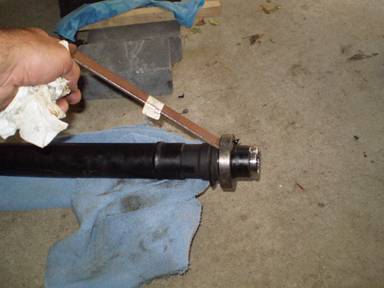
Pressing of the Bearing: I did not need to press the bearing off or on the shaft. I was able to do it simply with a regular hammer and a Small piece of ¾” x 1/8” thick steel stock I had lying around. It’s not a hard press fit at all. (See picture below)
Step by Step.
I jacked up the car and put the Jackstands under the Lift points on the rear of the car and I raised the front of the car approx 8-10" to be able to access the front and rear Driveshaft hardware.
After the car is up in the air take it out of gear and no handbrake. You will need to rotate the Driveshaft to loosen bolts.
With White-Out, Mark the Rear axle and shaft so you can reassemble it to the same position.

How to take out the shaft by yourself without it dropping: Loosen all 4 but remove only 3 of bolts to the rear of the driveshaft. Keeping the 4th in makes it easy to rotate the shaft to loosen the hardware at the transmission end.
Up front, Mark the Shaft in the same manner so you put it back in the same position.
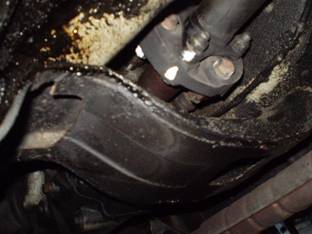
At the transmission, take off all three nuts that are facing the back of the car. Leave the Bolts in place. Now take out the 4 bolts (12mm socket) that hold the Center Support to the Body of the car. One bolt from Passenger side then one from the Drivers. Then support the shaft with one hand (or your knee) as you take out the last two bolts. Slowly let it hang.
Now take out the only remaining Bolt from the rear axle.
Holding both halves of the shafts pull it away from the three Bolts that are holding it to the Back of the Trani (Flex disc). The bolts will stay in place.
With the Shaft sitting on your chest, wiggle out from under the car.
Disassemble the Shafts from each other:
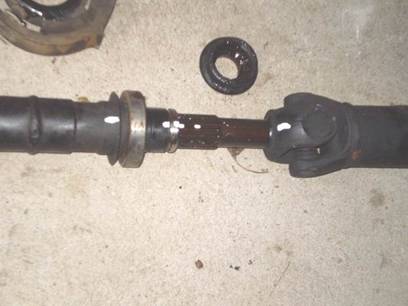
Before sliding the shafts apart, Mark both sides so you can put them back together in the same position. I separated the shafts until the Spline was showing, then I was able to pull the Rubber boot out of its groove of the front shaft and slide it toward the rear shaft. Then I could mark the end of spline with the very end of the Front shaft. See picture below; In this picture, I took the Boot and the Carrier off and put the halves together for better clarity.
With the Shafts separated, peel the Carrier off the bearing. Just grab it close to the bearing, lift the lip and pull, the bearing is just sitting in the carriers groove.
Removing the old Bearing: As I mentioned earlier, I used a hammer and a ¾” wide metal ‘rod’ (Ace Hardware sells 3’ lengths); positioned the end down low between the Dust cover and low section of the bearing and whacked it two times, Rotate the shaft and hit the bearing in another spot about two times. Keep hitting and rotating and you will see the bearing moving away from the dust cover. If you don’t rotate and hit the bearing in another spot, it will just bind up and not move.
The bearing will break free and come right off after it has moved about ½” You do not have to hit it off the entire 2” length of the shaft.
Take an emery cloth or a scouring Kitchen pad and clean up the area that the bearing is pressed onto in preparation for the new bearing.
Dirty 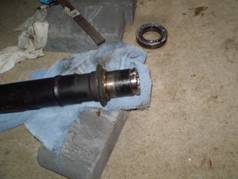
 Clean
Clean
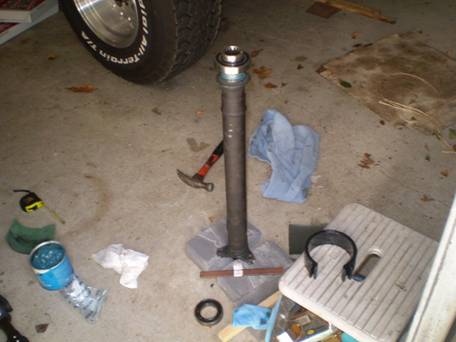
After the surface is clean, I put Wheel Bearing Grease on that mounting area and made sure grease was in the seated area of the shaft (closest to the dust cover) so it wont rust. I stood up that shaft (between two bricks) dropped the new bearing back on top and tapped it down with the same ¾” Flat Stock that I took it off with. Again, very important to hit once, move to another section, hit again. ALWAYS hit it the bearing closest to the Driveshaft so you don’t destroy the new bearing.

 Flat
metal
Flat
metal
Put some grease in the Groove of the Rubber Carrier then put it back on over the Bearing Keeping in mind the direction it needs to be installed. Large Rubber toward the back of the car. In the picture above, the Large Rubber would need to face away from the ground.
With the Rubber boot still on the rear shaft, slide the two together making sure your Markings are lined up.
Put the shaft back of your chest and wiggle under the car again.
While Lining up the marks on the Trani, put the front of the shaft back into the three bolts that are hanging out of the Trani (Flex Disc). Put on at least one bolt (loose) then go and lift the rear shaft into place and line up the marks there.
Now go ahead and put in all 4 Rear axle bolts.
Go to the Front and tighten all the trani hardware. Put the spring, washer and center bracket onto the Center Bushing and bolt to car. DONE.
Flex Disc
If you are also doing the Flex disc, Here are some pointers. There are arrows around the Perimeter of the Disc as well as the disc having Thick sections and thinner sections. These Arrows show the direction that the Bolts pass through the Disc. This will help you know on what Thick position of this disc get bolted to the Trani and which Thick section gets bolted to the shaft.
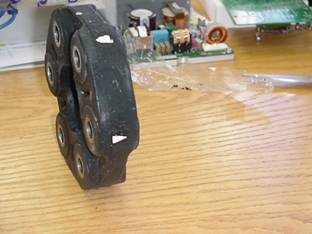
In this picture, If the Trani were on the left side, The Upper arrow would show the Bolts passing through the disc and into the Trani.
On
the lower arrow, the bolts would pass through and attach to the
Driveshaft. The Nuts are always on the
metal of either the trani or the Shaft so it sort of Keys this Disc.
I think
That Volvo had this setup so the Trani Pushes
on the Thick part of the Disc to push the Driveshaft around Instead of a
Pulling action on the thinner rubber of the Disc. I may be thinking to deep into it though.
I
marked the shaft and the Trani metal pieces that were paired up on a thick
section of the disc.

![]()
Tony H